Camera Diopter is one of those squeaky little things on a camera which doesn’t seem like much but if not done right, you bashing your head/camera against the wall is not a very unlikely phenomenon. Make no mistake, it is very well visible on most cameras, located right next to the viewfinder but since it is so small, it is very easy to be overlooked. Many people do not even know it exists. So what is this hoopla all about?
Let me explain.
Definition
The dictionary definition of a Diopter is pretty scary, it says:
Diopter: (noun) /dīˈäptər//daɪˈɑptər/, A unit of refractive power that is equal to the reciprocal of the focal length (in meters) of a given lens.
You absolutely need NOT understand any of that. We are photographers, not physicists alright.
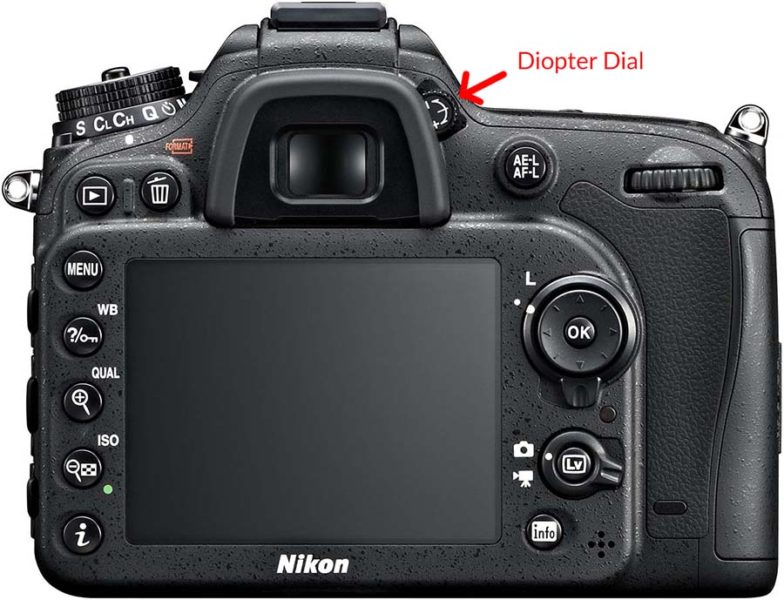
In simple terms, a Camera Diopter is an optical tool that adjusts your camera’s viewfinder to suit your eyes. You can adjust it on your camera by simply rotating a dial. In most of the modern cameras, the diopter wheel is located right next to the viewfinder itself. It has ‘+’ and ‘-‘ sign on it. In some cameras, it may also look like a slide.
Who Needs This?
Are you wondering, “my eyes are just fine….why do I even need this?” Actually, you don’t. Anyone who has a perfect 20:20 vision doesn’t need to use this at all. The Camera Diopter is intended to be used by photographers who do not have perfect vision and suffer from some form of nearsightedness or farsightedness.
A Diopter is basically a tool that allows a photographer to use the camera without him needing his glasses. So, by just adjusting the Camera Diopter to suit the photographer’s eyesight, he is able to ditch any external eye aids and use the camera freely without something bumping in between.

How Does It Work?
Hyperopia (farsightedness) and myopia(nearsightedness) are just eye conditions where the eyes of a person have difficulty in focusing on something far away or nearby respectively. The glasses or contact lenses that an optometrist might prescribe on such occasion is to just help the light rays focus better on the retinas. These external eye aids are nothing but convex or concave lenses that help the light converge properly. The Camera Diopter is designed to mimic exactly this phenomenon.
Inside the viewfinder of the camera, there are a set of optical elements which adjust the incoming light rays when you turn the dial one way or the other, which in turn plays with the convergence of the light much like any pair of glasses.
How To Adjust The Camera Diopter?
It is actually a very simple and easy process to set up your camera with your own custom adjustment. You can get the entire thing done in less than a couple of minutes.

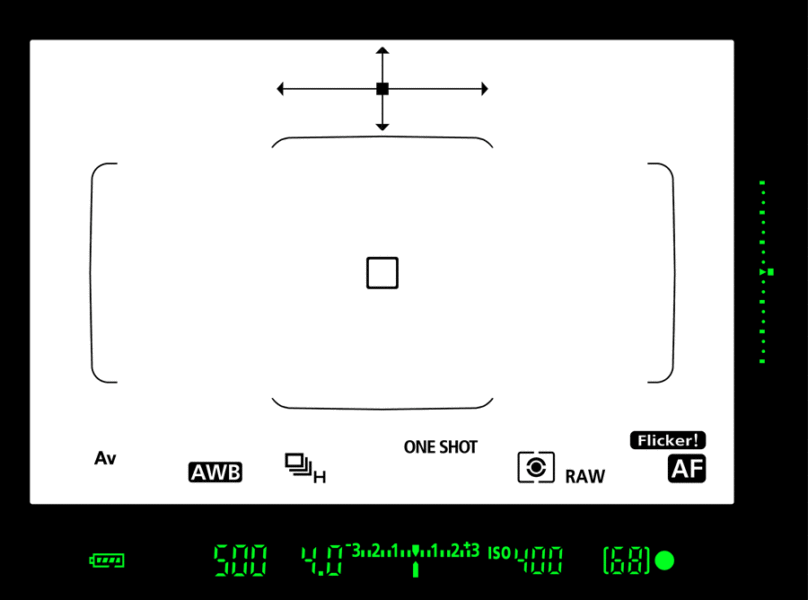
Before I explain the actual process you just need to know about this term called ‘symbology’. It is nothing but a fancy term that refers to all the data that is projected onto the viewfinder of your camera when you are shooting.
While shooting, the viewfinder shows you your aperture, shutter speed, ISO, whether or not your flash is activated, autofocus points, etc.. Remember all these together are called ‘symbology’, that’s it.
Continuing now.
Follow the steps below to adjust your Camera Diopter:
- Anchor your camera to something stable; rest it on a tabletop or best set it up on a sturdy tripod. It shouldn’t move during the process of adjustment.
- Now, point your camera at something that is well lit and has plenty of contrast like a big old signboard.

- Press the shutter button halfway and let the camera autofocus on the subject
- Look through the viewfinder and see if everything looks perfectly clear, sharp and in focus. The ‘everything’ includes the image of the subject and the symbology showing on the viewfinder.
- If ‘everything’ looks sharp, then you do not need to tamper with anything. Your Diopter is set alright. However, if you find the image or especially the symbology to be blurry, you have to start adjusting the Diopter.
Blurry Looking Symbology. Camera Diopter Not Configured Properly - Keep looking through the viewfinder and turn the Diopter dial slightly till all you see turns sharp. It is really that simple.
Sharp Looking Symbology. Camera Diopter Configured Properly


Just to double check and be on the safe side, point your camera towards some other subject and try to autofocus again. Is everything looking tack sharp? If it does, then congratulations you have just adjusted your camera’s Diopter to your own custom setting. Easy, wasn’t it?
Do I Have To Go Through This If I Have Good Eyes?
Like I said in the beginning, the Dioptre really isn’t that big of a deal but if it is not done correctly it might seem as if something is seriously wrong with the lens or worse the camera body itself. Just try and imagine what would happen if you do NOT have it correctly configured and you’re out shooting on manual focus. No matter how much you try and how hard you focus, you will NEVER get the perfect focus. Everything will look blurry as hell.
In case you use autofocus by chance, throughout the entire day you would keep shooting and wondering why on earth your costly new fancy camera is unable to focus on anything. But when you look at the image you just took on the LCD it looks fine. The autofocus is giving you a resounding beep of confidence every single time, but why on earth is the viewfinder looking so messed up? This would be the opportune moment to bash your head on the wall (don’t bash your camera, its way more expensive…;))


So the short answer is, even if you have perfectly good eyes go through the process of adjustment once to know for sure. It wouldn’t take more than a couple of minutes, so why risk it? Ideally, this should be one of the first things that you adjust once you get a new camera. You don’t have to do it every day, just set it once and forget it.
Conclusion
It really is no rocket science. All the Camera Diopter does is help a photographer who would otherwise use glasses to operate the camera without them. If it is not configured properly or if you have doubts, secure the camera on a tripod, point it towards a subject with contrast and keep rating the Diopter dial till everything is tack sharp.
Now just a small advice here. When adjusting the Diopter, look at the symbology more intently than the image itself. They should remain tack sharp and in focus AT ALL TIMES. This is a small nugget of information but is easily missed. Whether the image is in focus or not, the symbology should ALWAYS be in focus. So look closely at them and make the adjustments accordingly.
Done!
Bonus Tips
#1: Whenever you lend your camera to someone else make sure you tell them about the Diopter settings too. Otherwise after having a baffling day of shooting they may not be very kind to you. This is a tiny little thing like forgetting to take the lens cover off when shooting in a pre-DSLR era. Small but may turn out to be a big menace.
#2: Since the Diopter wheel is very exposed and right next to the viewfinder, it might occasionally get bumped into. Once in a while give it a check to make sure it is alright. Canon did try to relocate the Diopter dial under the rubberized eye rest on the viewfinder in some of the cameras to avoid just this. But in most of the cameras, it is out there exposed.
That is all folks! That is all you will ever need to know about this teeny tiny little dial on your camera.
Just answer me this, did you know about the diopter before you read this? Let me know below.
Hand Picked For You
- Blurry images, photographs coming out too dark or too bright, inaccurate colors,...
- Understanding image exposure and the maths behind it is the bedrock of photograp...
- The 35mm lens is undoubtedly a great contender for your travels photography need...
- It is a pity that most people miss the incredible gift that is the custom settin...
- Start on the right foot. Getting the absolutely fundamental principles of photog...
- A fully charged battery and the correct firmware is all you need to update your ...


Yes and i came to know about it accidently.